For a while now, the PiMox project has maintained an ARM64 port of Proxmox. I know a few users have been using our OpenWrt builds as guest VMs under it.
With a bit of tweaking I have managed to get Pimox to reliably install on a Ten64!
See my fork repo for more details.
This is a installer script for Proxmox/PiMox (Proxmox port for ARM64 machines) that
will work on the Ten64
It’s based off the original pimox7 installer script,
with tweaks to account for differences between the Raspberry Pi and Ten64
(for example, configuring GRUB to supply the kernel command line instead of RPI’s cmdline.txt).
Just after I finished testing the pimox7/PVE7.2 port, jiangcuo
published a set of packages for PVE7.3. Thankfully this installer script will work with their
repository as well.
If you want to use the pimox7 package set, just edit the repository used in the install script.
Once your fresh Debian install is up and running, copy the IA-Install.sh script to your Ten64
Run the IA-Install.sh as the default (debian) user, from the serial console (you will lose network connectivity during the install process!)
debian@debian:~$ sudo -i # (elevate to root, needs to be -i to get the root user profile) root@debian:/home/debian# bash IA-Install.sh
Wait for the install to finish. It will reboot automatically.
Note: About 1GB of packages will be downloaded during the install process.
Notes
eth0 will be setup as the uplink for the default bridge interface vmbr0.
You can change this by editing /etc/network/interfaces, or using the Network configuration UI in Proxmox.
When creating a VM you will need to note the following:
You need to select UEFI as the BIOS for VMs. You will be prompted to assign a disk
drive for UEFI variables.
On Proxmox/PiMox 7.2, it creates a VM using IDE for the CDROM as default. This will not work.
In the VM creation wizard, leave the CDROM unconnected.
When the VM has been created, delete the ide2 CDROM device and create a new one using SCSI.
In the boot order options, edit the boot order so the new scsi CDROM device is after the VM disk and PXE/network
Troubleshooting
Sometimes the bridge interface (vmbr0) does not start automatically on boot.
You might need to login on the serial console and bring it up manually
Many thanks to the Pimox community for bringing Proxmox to Arm64!
μVirt vs Proxmox/Pimox: which is better?
Proxmox is significantly more fully featured than μVirt (example: pause/resume VMs, LXC, more storage options, backup functionality), whereas μVirt was designed for low-overhead virtualization in ‘converged’ networking and compute environments. It’s smaller footprint also allows us to experiment with features like DPAA2 passthrough, self-contained k3s setup and more.
We are still developing μVirt and there are a few features we intend to add in the coming months (such as our 4G/5G management stack, configuring guest workloads like AWS Greengrass and potential hardware network acceleration)
I wanted to try this out, but the install script failed…
Reading package lists… Done
Building dependency tree… Done
Reading state information… Done
E: Unable to locate package proxmox-ve
Reading package lists… Done
Building dependency tree… Done
Reading state information… Done
E: Unable to locate package pve-manager
Reading package lists… Done
Building dependency tree… Done
Reading state information… Done
E: Unable to locate package proxmox-ve
Could be due to this error that came earlier:
Err:9 APQA网盘 - /foxi/Virtualization/proxmox/foxi/ bullseye Release
404 Not Found [IP: 162.14.99.182 443]
Reading package lists… Done
E: The repository ‘APQA网盘 - /foxi/Virtualization/proxmox/foxi/ bullseye Release’ does not have a Release file.
N: Updating from such a repository can’t be done securely, and is therefore disabled by default.
N: See apt-secure(8) manpage for repository creation and user configuration details.
I saw on the proxmox site that Proxmox VE 7.4 is out. Is that maybe the reason?
I’ve been able to load the latest Proxmox 8.1 using the Debian bookworm from the recovery store and using jiangcuo Bookworm repository and instructions.
Performance was great and was having fun until:
An update has caused the untagged traffic to be discarded to the physical ethernet ports from VMs when using VirtIO network on a GuestVM.
Traffic on tagged VLANs have no issues.
Changing the network card emulation (checked the other three) resolves the issue but it comes with a serve performance hit.
GuestVMs can talk to host and other GuestVMs but fail as soon as they leave the box.
Unfortunately it’s on the 1 and 10G ports.
I was able to use a USB 3.0 2.5G Realtek dongle and this device has no issues with untagged traffic leaving the box.
Hence I suspect the switch, is there any updates or known bugs? Unless it’s in the kernel or mixture.
Minor concerns:
What’s the best way to control the fan? it feels like it’s at max, not sure if it’s summer here in Australia or no feedback controller.
Any patch to enable the SFP+ activity lights for Debian Bookworm?
Interesting, I’ll take a look at that sometime. My hunch is that it’s something to do with IP checksum offloads.
Possibly, there was another user that had issues with checksums.
Another device on their network was appending garbage to end of the Ethernet frames, and the DPAA2 hardware was including the garbage data in the checksum calculations (when the frame left the Ten64). It could be a similar problem
I haven’t followed up that issue yet, but there are other ways it could be resolved without fixes upstream.
You will need to compile the emc2301 module from here: traversetech / ls1088firmware / traverse-sensors · GitLab
Make sure to add it to /etc/modules so it loads at boot.
The fan speed should go down immediately when it’s loaded, and it will automatically increase with CPU temperature
You can do the same with ten64:green:sfp2:up and eth9
Unfortunately this has to be done each boot, due to the DPAA2 architecture having split MACs and PHYs, it isn’t possible to use the device tree bindings (hope to fix that someday).
I can mostly work around the issues with my managed switch, but the WAN / ISP connection not so simple, I could put a managed switch in to change the VLAN. I’m also finding USB ethernet adaptors have their own issues as well.
I set the WAN port PVID to a different VLAN and attached it to the OpenWRT WAN port as a tagged VLAN.
Unfortunately I’m unable to receive the STP packets, but it is workable.
I am having difficulties passing the mt7916 WIFI card to the OpenWRT VM.
I was able to perform this function when using μVirt
I am receiving an error: when starting the VM.
kernel: vfio-pci: probe of 0001:03:00.0 failed with error -22.
Searching the web, it says that error is either IOMMU is not enabled or the device is linked to others in a IOMMU group.
Judging by my dmesg, it appears the device is sharing IOMMU group
[ 6.528487] pcieport 0001:00:00.0: Adding to iommu group 2 - Freescale Semiconductor Inc Device 80c0
[ 6.545944] pcieport 0001:01:00.0: Adding to iommu group 2 - Pericom Semiconductor Device b304 (rev 01)
[ 6.552493] pcieport 0001:02:01.0: Adding to iommu group 2 - Pericom Semiconductor Device b304 (rev 01)
[ 6.577776] pcieport 0001:02:02.0: Adding to iommu group 2 - Pericom Semiconductor Device b304 (rev 01)
[ 18.411845] mt7915e 0001:03:00.0: Adding to iommu group 2
[29246.757966] pci 0001:03:00.0: Removing from iommu group 2
[29257.901759] vfio-pci 0001:03:00.0: Adding to iommu group 2
I’ve tried following this guide, but it’s written for Intel and AMD and doesn’t appear to have any impact. I suspect the CPU and or kernel doesn’t have ACS.
Are there any kernel commands I need to enable to help separate, or should I try using the other PCIe port?
I can reproduce the issue, so that’s a start.
It seems Proxmox doesn’t bridge the VM directly to the Linux bridge, but through a veth pair. So my guess is the problem is in there somewhere.
Yes, both miniPCIe slots live behind a PCIe switch, so if one is passed through, the whole group will be.
Do you have a card in the other miniPCIe slot? If so, that also needs to be passed through.
The switch device itself will be handled automatically.
The only other tip I have is that disabling PCIe deep sleep states can help, it doesn’t seem to work well on the LS1088 SoC.
To do this, add vfio-pci.disable_idle_d3=1 to the kernel command line. Adding to GRUB_CMDLINE_LINUX_DEFAULT in /etc/default/grub and running update-grub will apply it to the next boot.
I’ve tried a few different things with varying success.
I used the traverse Debian Kernel 6.2 per documentation and found more network connectivity. Yet to try untagged native but STP is working again.
For the Device passthrough I haven’t had any success, I tried installing a different MediaTek device in the other slot. Still get the VFIO bind error.
I found a kernel patch talking about:
The current smmu-v3 driver does not enable PCI ATS for physical functions
of ATS capable End Points when booted in smmu bypass mode
(iommu.passthrough=1)
Could this be the blocking point for pass through?
I haven’t gone looking for the actual “source” of the problem yet, I think something at the start of the chain (like tap, vhost-net or bridge) is resizing the buffer that holds the packet and causing it to be misaligned.
Interesting, thanks for the link.
I haven’t done VFIO in a while so I need to setup a test with a recent kernel version and check from there.
The network issue is a recent kernel regression. Given how recent it was, I didn’t think it was going to be something so simple breaking. Other VM hosts like muvirt are also affected.
A patch to the DPAA2 Ethernet driver that was accepted in early December, added the requirement for the outbound packet buffers to be aligned.
This was supposed to fix an issue with jumbo frames, but caused this problem with vhost-net as well.
It has a revert for the tx-align change, so virtual machine networking should work correctly. The same change will be rolled out to all Traverse builds (Kernel, OpenWrt, muvirt) until a better solution is found.
For vhost-pci, I think there may be an issue on recent kernels that is exposing a known problem with the Layerscape PCIe and the Pericom PCIe switch.
If you see a kernel panic with pci_generic_config_read, it’s that problem (see this OpenSUSE bug report for the rundown). I think I will have to file a kernel bug to get attention on it.
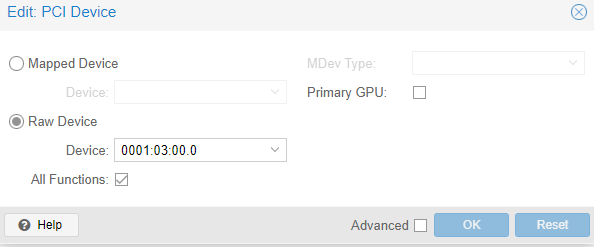
The following passthrough configuration seems to work with the two cards I’ve tested (MT7916 and Intel AX210):
6.1.x kernel (need to bisect to see when this problem got worse)
vfio-pci.disable_idle_d3=1 added to the kernel command line
$ grep GRUB_CMDLINE_LINUX_DEFAULT /etc/default/grub GRUB_CMDLINE_LINUX_DEFAULT="earlycon arm-smmu.disable_bypass=0 net.ifnames=0 vfio-pci.disable_idle_d3=1"
(Make sure you run update-grub after modifying /etc/default/grub)
In Proxmox PCI device options, ensure “All Functions” is ticked
Unfortunately, I’ve just got a big cloud backup going via my ten64, but as soon as that finishes I’ll restart the new kernel. The one night I’m unable to restart a potential fix is released.
Thank you for investigating this issue, Will let you know the results.
Feb 07 07:08:01 traverse kernel: vfio-pci: probe of 0001:03:00.0 failed with error -22
Feb 07 07:08:01 traverse pvedaemon[8611]: Cannot bind 0001:03:00.0 to vfio
Feb 07 07:08:01 traverse pvedaemon[2927]: <root@pam> end task UPID:traverse:000021A3:000241B8:65C32C51:qmstart:103:root@pam: Cannot bind 0001:03:00.0 to vfio
I’ve pushed a bunch of changes to the original installer script, for the new repo and kernel, as well as installing ifupdown2:
The method jiancuo provides for installation on stock Debian also works:
The main issue with installation is, depending on how you installed Debian, you won’t have ifupdown2 and need to remove whatever network manager is configured (be it NetworkManager, netplan or something else) and ensure /etc/network/interfaces is set up properly.
Even after that, ifupdown might still have problems (e.g “ifup vmbr0” failing). I haven’t had an opportunity to look into why it’s not functioning 100% of the time.
# If this symlink/folder (driver) exists, then the card is being controlled
# by another driver, and you need to unbind it from there first
readlink -f /sys/bus/pci/devices/0001\:03\:00.0/driver

# For example, if mt7915e is holding the card
echo 0001\:03\:00.0 > /sys/bus/pci/drivers/mt7915e/unbind
# or
echo 0001\:03\:00.0 > /sys/bus/pci/devices/0001\:03\:00.0/driver/unbind

# Bind the card to vfio-pci
echo "vfio-pci" > /sys/bus/pci/devices/0001\:03\:00.0/driver_override
echo 0001\:03\:00.0 > /sys/bus/pci/drivers/vfio-pci/bind
If the last step fails, the last couple of lines in dmesg should say why vfio-pci can’t bind to the card.